Here is a project that I have been working on in my spare time. It is a Mario Brothers "Mario Cat Play Fort". I saw the original idea online and took it from there.
Here is the link to the original: http://imgur.com/a/rz77J
I however, did not feel like dealing with a bunch of messy/nasty paint, and so I decided early on in my project to do as much of the coloring as I possibly could, using the lovely, clean and sleek Mactac - readily found at the dollar stores!
fig.1
Basically, you build a box with an open back. The size is entirely up to you, but as a starting guideline - my measurements were: 28 inches long; 21 inches high; 10 inches wide.
Use 1x10 for the sides and any SMOOTH plywood or particle board for the front of the box.
Also, you will need a piece of lumber in the back of the box, in order to attach it to the wall - 2x4; 1x4; 1x6 will work fine. (fig.2)
fig.2
...you are looking at two - YES TWO!!! of the forts, because I have two sons with two cats/son! ( a lot of twos!....) Note that there is carpet on the inside floor of the box and also it is on the side closest to the upper pipe - to help the cats climb.
Assemble the pieces using screws, preferably.
At the dollar store purchase the following:
Once the box is built, wrap the outside of it with the red mactac. Layout your mortar lines with a measuring tape and a dry erase marker and create the lines using the black electrical tape. On the box's inside, I used the black mactac.
The green pipes which your little Mario Cats will be going into, are made from the common, plastic flower pots ( usually chucked out once the plant gets home )...however, these pots can be readily found in any Thrift Store - oh how I do love those places!!
I paid 50¢ for each pot. :)
fig.3

Now in order to make the top rings, the peel & stick floor tiles are cut into 2.5 inch strips. Then laminate them with green mactac. Also, it is necessary to glue them on, because their own intrinsic glue is not strong enough to hold them to the circle shape of the pots. After gluing, tie a bootlace over top of the tile, until the glue sets! ( brilliant idea or what? ) see fig.2
***Note***
I also have cardboard strips glued on underneath the tiles, which builds out the ring.
When I followed the original design, ( see link at the beginning of this post ) of only using cardboard strips for the top ring, I found that it did not bend as I liked and left the ring looking very hex-a-gon-ally :((((
- so I changed the construction product to the smooth tiles! Worked pretty good over-all.
Cut some circles into the box, by first tracing the outline of the pot, and then using a jigsaw for the cut.
I bought the peel and stick "fake grass" carpet tiles and glued them onto the top of the box, so that when the Mario Kitties are chilling out, they will have a nice cozy rest. :) just like leopards in the jungle. (fig.4)
fig.4
Inside the pots, glue some more carpet, for the cat's claws to sink into when climbing up into! (fig.5) AND also onto the inside wall, closest to the top pipe - as mentioned earlier....see above :)
fig.5
The stars, mushrooms and Mario symbol, are made from tracing print-outs from the computer, onto the yellow and green mactac, and then carefully cutting out the shapes. Position them where ever you like. I made a small star and a large star shape for a little variety, and switched around the colors for the two mushrooms. (fig.1,3,6)
fig.6

I also have a hidden Luigi "L" at the bottom of the box (fig.7) - kind of like one of the many Easter Egg surprises found throughout the Mario Bros. series of games. :)

Touch up the edges around the door's opening with the black craft paint. This will help blend the hidden door when it is closed.
At this point you are basically finished. I have taken catnip and sprinkled it EVERY WHERE, but especially rubbing it into any carpeted surfaces! (fig.9)
fig.9
fig.10
Go mount the Mario Cat Play Fort onto the wall. Remember to try and hit at least one wood stud behind the drywall. Use 2- 2 inch screws. A good height is shown in fig.11....roughly the height of a tall chair or bar stool.
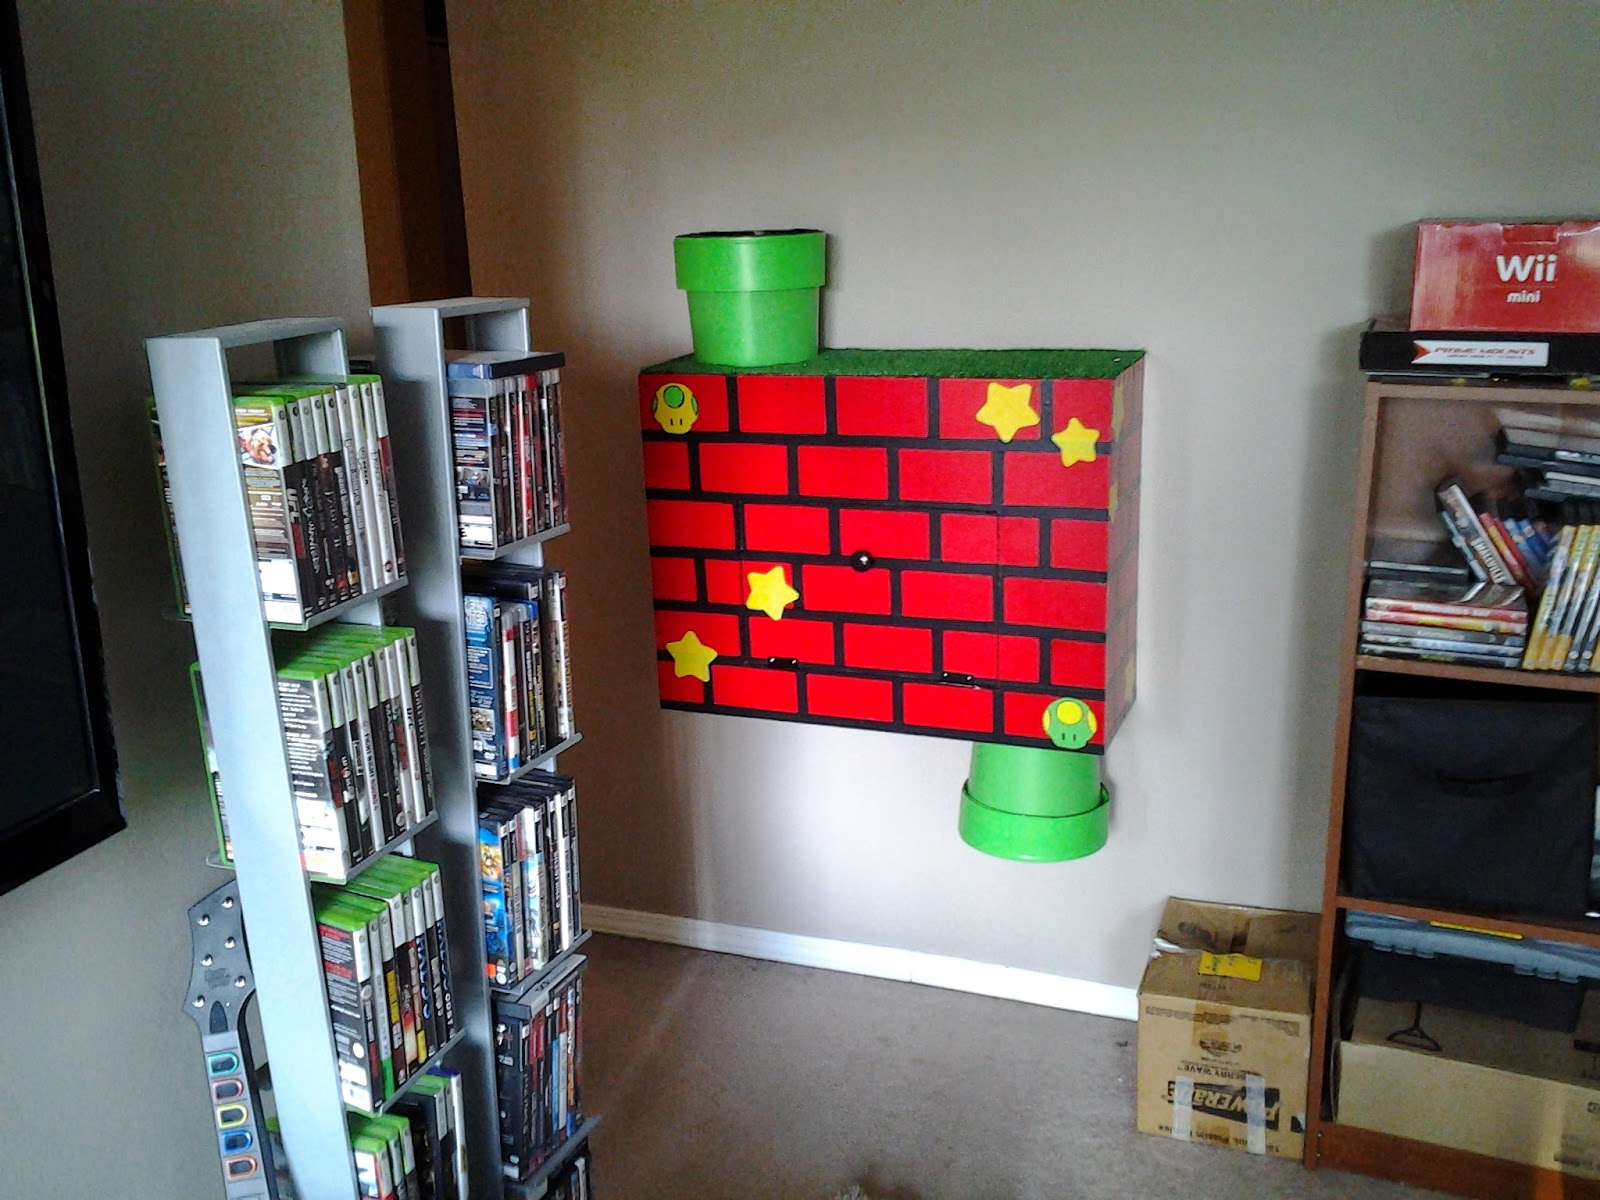
Sit back and enjoy! :))) A welcome addition to any gamer's home!


Here is the link to the original: http://imgur.com/a/rz77J
Very nice! Very!!! :)
I however, did not feel like dealing with a bunch of messy/nasty paint, and so I decided early on in my project to do as much of the coloring as I possibly could, using the lovely, clean and sleek Mactac - readily found at the dollar stores!
fig.1
 |
| The Finished Product |
Basically, you build a box with an open back. The size is entirely up to you, but as a starting guideline - my measurements were: 28 inches long; 21 inches high; 10 inches wide.
Use 1x10 for the sides and any SMOOTH plywood or particle board for the front of the box.
Also, you will need a piece of lumber in the back of the box, in order to attach it to the wall - 2x4; 1x4; 1x6 will work fine. (fig.2)
fig.2
 |
| Backview - pardon the mess heh heh :) |
Assemble the pieces using screws, preferably.
At the dollar store purchase the following:
- Mactac (red/green/black/yellow)
- carpet
- glue
- black electrical tape
- black permanent marker (for touch ups)
- black craft paint/brushes
- peel & stick floor tiles
.jpg) |
| whoo hoo! - I had a chocolate bar and feel great now!!! |
The green pipes which your little Mario Cats will be going into, are made from the common, plastic flower pots ( usually chucked out once the plant gets home )...however, these pots can be readily found in any Thrift Store - oh how I do love those places!!
I paid 50¢ for each pot. :)
fig.3
First thing to do with the pots, is to cut out their bottoms.
Now in order to make the top rings, the peel & stick floor tiles are cut into 2.5 inch strips. Then laminate them with green mactac. Also, it is necessary to glue them on, because their own intrinsic glue is not strong enough to hold them to the circle shape of the pots. After gluing, tie a bootlace over top of the tile, until the glue sets! ( brilliant idea or what? ) see fig.2
***Note***
I also have cardboard strips glued on underneath the tiles, which builds out the ring.
When I followed the original design, ( see link at the beginning of this post ) of only using cardboard strips for the top ring, I found that it did not bend as I liked and left the ring looking very hex-a-gon-ally :((((
- so I changed the construction product to the smooth tiles! Worked pretty good over-all.
Cut some circles into the box, by first tracing the outline of the pot, and then using a jigsaw for the cut.
I bought the peel and stick "fake grass" carpet tiles and glued them onto the top of the box, so that when the Mario Kitties are chilling out, they will have a nice cozy rest. :) just like leopards in the jungle. (fig.4)
fig.4
 |
| top hole cut-out (looking down) |
fig.5
 |
| hole cut-out from the inside (looking up) |
fig.6
I also have a hidden Luigi "L" at the bottom of the box (fig.7) - kind of like one of the many Easter Egg surprises found throughout the Mario Bros. series of games. :)
fig.7
 |
| The secret "L" for brother Luigi |
You will also need to get a pair of hinges and a latch (fig.8).
I drew out the door size, based upon the location of the "brick lines", which would help to camouflage the door.
Cut out the door.
fig.8
Presto ♪♪
Touch up the edges around the door's opening with the black craft paint. This will help blend the hidden door when it is closed.
At this point you are basically finished. I have taken catnip and sprinkled it EVERY WHERE, but especially rubbing it into any carpeted surfaces! (fig.9)
fig.9
 |
| I don't like taking chances. |
I have also bought them a new toy - catnip of course! (fig.10)
fig.10
 |
| too cute! |
Which shall be placed inside the fort to encourage exploration by the cats.
Go mount the Mario Cat Play Fort onto the wall. Remember to try and hit at least one wood stud behind the drywall. Use 2- 2 inch screws. A good height is shown in fig.11....roughly the height of a tall chair or bar stool.
fig.11
Sit back and enjoy! :))) A welcome addition to any gamer's home!
 |
| Ralph & Zoe |
Looks like it's a hit :)))
The End
loooooove <3
ReplyDeletesuch a cutie
ReplyDelete